Charger Placement in a Garage
Short answer
Find the car's charge port location before choosing a mounting spot, then measure the actual cable path rather than the straight line, because the drop from the mounting height plus working slack adds roughly 5.5 feet. A 25 foot cable covers almost every garage layout.
Placement is the cheapest decision in a home charging project and the one people get wrong most often. It costs nothing to move a mounting position two feet before the holes are drilled and it costs a fortune afterwards, because relocating a charger means a new circuit route, new terminations and another inspection. Yet most owners choose the spot by looking at the wall rather than at the car.
The correct order is the reverse of the intuitive one. Find the charge port on the car. Decide which way the car will park, for the next ten years and not just this week. Then measure the cable path that connects the two, including the parts of it that are not a straight line. Only then pick the wall.
If reach is your constraint
25 foot cable
Autel
Autel MaxiCharger 40A
$375.99
A 40 amp unit with a 25 foot flexible cable, listed for indoor and outdoor use, which is the combination that solves placement problems. Cable length reaches a port on the far side of the car; extra amperage does not.
- Continuous
- 40 A
- Breaker
- 50 A
- Power
- 9.6 kW
- Cable
- 25 ft
- Plug
- NEMA 14-50
- Rating
- Indoor and outdoor
Paid link. Price shown when researched.
Why does the charge port location decide the mounting spot?
Charge ports sit in four broadly different places across the current market, and each one implies a different mounting wall. Some cars put the port in the front left fender, ahead of the driver's door. Some use the front right. Some put it in the rear quarter panel behind the driver's door, and some in the rear quarter on the passenger side. There is no convention, models change between generations, and two cars in the same driveway routinely disagree.
Find yours before anything else, and find it on the actual car rather than from memory. Then work out where that point lands in the garage when the car is parked normally. Mark it on the floor with tape. That piece of tape is the single most useful thing in this entire project, because every subsequent decision measures from it.
The reason this matters so much is geometric. A port on the same side of the car as the wall you were going to use is a three foot reach. The same port with the wall on the other side of the car is a twenty foot reach that has to travel around the front or rear bumper, because a cable cannot pass through the vehicle. One decision, made before any wiring exists, is the difference between those two numbers.
Which way will the car park, and will that change?
Nose in or reverse in changes which end of the car the port sits at, and it is worth deciding deliberately rather than by habit. Reversing in is generally better in a garage because it puts the front of the car toward the door where visibility is best on the way out, but plenty of people will not do it and it is pointless to plan an installation around a behaviour that will not stick.
Ask two questions honestly. Does the garage have room to reverse in given the driveway approach? And will everyone who parks that car actually do it? If the answer to either is no, plan for nose in, because a charging arrangement that only works when the car is parked the unusual way generates a daily annoyance that eventually gets solved by running the cable across the roof of the car.
The same question applies to which bay the EV uses in a two-car garage. If there is any chance the cars swap bays, and there usually is, place the unit where it can serve either. A position near the middle of the shared wall, or on the end wall between the two bays, is far more flexible than a spot at the outer edge of one bay.
How do you measure the real cable path?
The straight line distance from the unit to the port is never the cable length you need, and the gap is consistently larger than people expect. Three components get added to every measurement. The cable drops from the mounting height to the port height, which is typically around 3.5 feet of vertical travel. You need working slack so the cable is not taut when connected, which is another 2 feet. And if the port is on the far side, the cable travels around the bumper rather than through the car.
Together the drop and slack add about 5.5 feet to every scenario before the horizontal distance is counted at all. The table below works through the four common situations for a typical crossover in a typical single bay.
| Scenario | Across the aisle | Along the car | Around the bumper | Total cable needed | 16 ft | 20 ft | 25 ft |
|---|---|---|---|---|---|---|---|
| Port on the near side, within a couple of feet of the unit | 3 ft | 2 ft | 0 ft | 10.5 ft | Yes | Yes | Yes |
| Port on the near side, at the opposite end of the car | 3 ft | 12 ft | 0 ft | 20.5 ft | No | No | Yes |
| Port on the far side, reached around the front or the rear | 3 ft | 4 ft | 9 ft | 21.5 ft | No | No | Yes |
| Port on the far side and at the opposite end of the car | 3 ft | 12 ft | 9 ft | 29.5 ft | No | No | No |
Read the bottom row carefully, because it is the one that ruins installations. A port on the far side of the car and at the opposite end from the charger needs about 29.5 feet of cable, which no consumer station ships with. The fix is not a longer cable, it is a different mounting position, and that is precisely why the tape on the floor comes before the drill.
Measure with string rather than a tape measure if you can. Run a length of string from the proposed mounting point, down to floor level, around the route the cable would actually take, and to the port. The string reproduces the drop and the bend radius that a tape measure held taut across the room does not.
How high should the unit be mounted?
Follow the manual, because the mounting range in the instructions is part of what the unit was listed with. Most give a range whose lower bound is somewhere around 18 inches above the floor and whose upper bound is around 48 inches, and both bounds exist for reasons.
The lower bound is about water, debris and physical damage. The upper bound is about reach and about the weight of the cable hanging from the enclosure. Within the permitted range, mounting toward the higher end keeps more of the cable off the floor and makes the connector easier to handle at chest height, at the cost of paying for a slightly longer drop in the cable budget.
One placement detail that is easy to overlook: leave room above the unit for the cable to hang without kinking where it exits the enclosure. A charger mounted tight under a shelf forces the cable into a sharp bend at the strain relief, which is the part of the cable that fails first.
How much clearance does the unit need, and the panel?
Two separate clearances apply and people confuse them. The charging station needs whatever working and ventilation space the manufacturer specifies around the enclosure, which is usually modest. The electrical panel needs the working space that the code requires in front of it, which is not modest at all, and which is the one that gets built over.
A dedicated space in front of a panel has to stay clear from the floor to well above the enclosure, deep enough for somebody to work on it safely, and it cannot be used for storage. In a garage this space disappears in stages, first to a bicycle, then to shelving, then to a chest freezer. If a charger is mounted in a way that encourages storage to migrate into that zone, the installation has created a problem it did not have.
The practical rule is to keep the charger out of the panel's working space entirely rather than mounting it beside the panel because that is where the circuit is shortest. A slightly longer conduit run is considerably cheaper than a failed inspection or a panel you cannot get to.
Why does a 25 foot cable solve more problems than more amperage?
This is the most useful trade in home charging and almost nobody makes it deliberately. Compare the two upgrades honestly. Stepping from a 40 amp station to a 48 amp station takes delivered power from 9.6 kW to 11.5 kW, a gain of 1.9 kW. Across a ten hour overnight window that is a difference most households would need a spreadsheet to detect, and it only exists at all if the car's onboard charger can accept the higher figure, which many cannot.
Stepping from a 16 foot cable to a 25 foot cable changes which parking orientations work, whether the second car can use the same station, and whether the cable has to be dragged across the floor every evening. That is a difference you meet twice a day for a decade.
The arithmetic on the amperage side is laid out in 32A versus 40A versus 48A, and the stations that ship with genuinely long cables are collected in the long cable charger roundup. If you have already bought a short-cabled unit, an extension is a defensible last resort rather than a first choice, and the conditions under which it is defensible are in the extension cable roundup.
Two-car garages and the second EV
Households add a second electric car far sooner than they expect, and the placement that serves one car perfectly often serves two badly. There are three arrangements and they differ in cost by an order of magnitude.
The cheapest is one station placed centrally enough to reach both cars, with the cable moved between them. A 25 foot cable and a sensible mounting point make this work more often than people assume, and for two cars that are rarely both low at once it is genuinely sufficient. The daily cost is unplugging one and plugging in the other.
The middle option is two stations that share one circuit, with the manufacturer's power sharing splitting the available current between them. Both cars stay plugged in permanently, each gets roughly half the output when both are charging and the full output when it is alone, and the wiring cost is one circuit rather than two. This is where a load management capable station earns its price.
The most expensive option is two separate circuits, which needs panel capacity for both and is usually the point at which a service upgrade enters the conversation. Very few households need it. Two cars sharing 48 amps overnight is comfortably enough for normal driving.
How do you keep the cable off the floor?
A cable on a concrete floor gets driven over. Not occasionally, routinely, and usually by the car it charges. The damage from repeated crushing is cumulative and invisible: conductors work-harden and break inside an intact jacket, and the strain relief at the connector loosens. The eventual symptom is an intermittent fault that gets blamed on the station.
The fix costs less than twenty dollars and takes ten minutes. A connector dock holds the head at a sensible height and keeps the contacts out of dust and water. A J-hook beside it holds the cable in a wide loop rather than a tight coil, which matters because a tight coil sets a permanent memory in the jacket and a cold garage sets it faster.
Cable management that keeps the cable off the concrete
A dock for the connector and a hook for the cable. The combination kits are the simplest purchase; the hook packs are for running a long cable along a wall in wide loops.
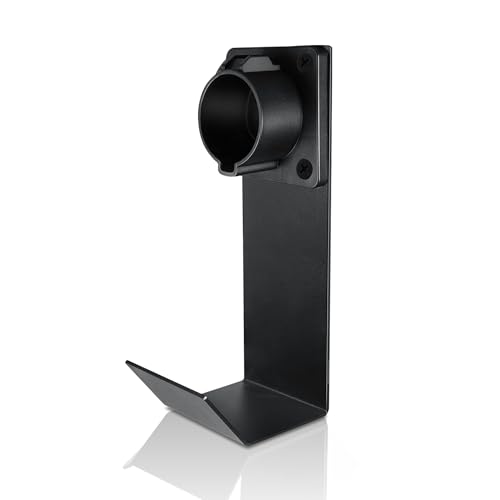
Lectron
Lectron J1772 Holster and J-Hook Combo
$19.99
A connector dock and a J-hook in one purchase, which is the complete solution rather than half of it. The head sits in the holster and the cable hangs in a wide loop on the hook.
- Fits
- J1772
- Parts
- Dock and hook
- Mount
- Wall
Trade-off Fixed geometry, so check the spacing suits the wall you have before drilling.
Check price
MECMO
MECMO J1772 Holster and J-Hook Wall Mount
$16.99
The same holster and J-hook idea at a lower price, which makes it easy to fit a second one on the far side of a two-car garage rather than walking the cable across.
- Fits
- J1772
- Parts
- Dock and hook
- Mount
- Wall
Trade-off Lighter construction than the metal alternatives, so avoid using it as a handhold.
Check price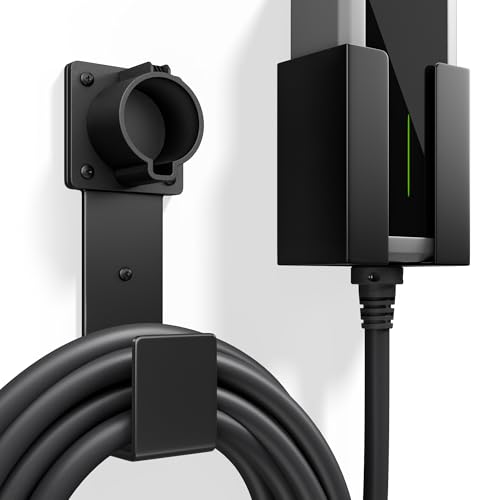
bussdis
bussdis J1772 Holder with Cable Storage
$17.99
A dock with an enclosed cable storage box, which suits a tidy garage wall and keeps an adapter and the connector out of dust between sessions.
- Fits
- J1772
- Storage
- Enclosed box
- Mount
- Wall
Trade-off Takes more wall area than a bare hook, which matters on a narrow strip beside a door.
Check price
Gisafai
Metal J-Hook Cable Supports, 25 Pack
$15.99
Galvanised steel J-hooks in a pack of twenty-five, for supporting a long cable along a wall or a ceiling joist in wide loops instead of one tight coil.
- Quantity
- 25
- Material
- Galvanised steel
- Size
- 3/4 in
Trade-off Just hooks, so pair them with a proper connector dock rather than hanging the head on one.
Check pricePaid links. Prices shown when researched and change without notice.
Two habits matter as much as the hardware. Loop the cable loosely rather than winding it tightly around the hook, and dock the connector rather than resting it on the floor or hooking it over a shelf edge. Dropping the head on concrete is what actually kills connectors, and it is entirely avoidable. The wider set of options, including retractors and ceiling-mounted arrangements for a deep bay, is in the cable management roundup.
Does the charger need impact protection?
If a vehicle can hit it, it needs protecting, and this is a genuine code consideration rather than a nicety. Equipment subject to physical damage requires protection suited to the exposure, and a charging station mounted on a wall inside the swept path of a car qualifies. Inspectors do look at this, particularly on a unit mounted low on an end wall a car noses toward.
The best fix is free: move the unit out of the drive path. A side wall beside the parked car is almost never in the path; an end wall directly ahead of the bumper almost always is. Where relocation genuinely is not possible, bollards or a steel guard in front of the unit are the conventional answer, set into the slab rather than surface fixed if they are expected to stop anything.
Two related risks are worth the same thought. A unit mounted where a car door opens into it will eventually be hit by the door. And a connector docked where a wing mirror passes gets clipped. Both are solved by standing in the garage and opening the doors before drilling.
Common placement mistakes
Mounting beside the panel because the wiring is shortest there
The panel is usually on an interior wall at the back of the garage, which is frequently the furthest point from the car's charge port. Conduit is cheap and reach is not. Run the circuit to where the charger should be, and keep the panel's working space clear while you are at it.
Planning around one car
The car you own now may not be the car you own in five years, and port locations vary widely between models. A central mounting point with a long cable survives a vehicle change. A position chosen to give a two foot reach to one specific fender does not.
Forgetting the door and the garage door track
Garage door tracks, springs and opener rails eat exactly the wall space that looks available. So does the swing of a service door. Check the full range of motion of everything that moves before committing to a mounting height.
Treating a shared circuit as a placement solution
Putting a receptacle on an existing garage circuit to save a run is not a placement decision, it is a circuit decision, and charging equipment needs its own dedicated circuit. The reasoning is in dedicated circuit requirements.
Where to go next
Mark the port position on the floor, measure the path with string, and choose a cable length from the table above before you choose anything else. Once the position is settled, the circuit follows: price the parts and the run in the plug-in Level 2 buildout, and if the charger is going on a wall that takes weather rather than a sheltered garage wall, read outdoor EV charger installation before choosing the unit, because the enclosure rating narrows the field considerably.
Common questions
Where should an EV charger be mounted in a garage?
On the wall closest to where the car's charge port ends up when parked the way you actually park, at the height the manufacturer's manual specifies, with clear working space in front of it and outside any drive path. Decide the port side first, because a unit mounted on the wrong wall turns a two foot reach into a twenty foot one and no amount of amperage fixes that.
How high should a home charger be mounted?
The manual governs, and most specify a range with a lower bound near 18 inches above the floor and an upper bound around 48 inches. Within that range, higher keeps the cable off the floor and lower reduces the drop you pay for in cable length. A comfortable working height for the connector is around chest level, which usually lands near the top of the permitted range.
Is a 25 foot cable long enough?
For almost every garage, yes. The worst realistic case, a port on the far side of the car and at the opposite end from the unit, needs roughly 29.5 feet once the drop from the mounting height and a couple of feet of working slack are counted. A 25 foot cable covers everything short of that, and repositioning the unit or reversing the way you park closes the remaining gap.
Should I buy a longer cable or a higher amperage charger?
The cable, in almost every case. Going from 40 to 48 amps adds 1.9 kW, which is a few extra miles of range per hour that an overnight charge makes invisible. Going from a 16 foot cable to a 25 foot cable is the difference between an installation that works and one that needs the car parked in exactly one orientation forever. Length is the upgrade you notice daily.
Can I run the charging cable across the garage floor?
You can, and it is the most common way cables get damaged. A cable lying on concrete gets driven over, dragged, stood on and left in whatever water comes off the car in the winter. Repeated crushing damages conductors and strain reliefs in ways that are invisible from outside. Hang the cable in wide loops on a hook and dock the connector in a holster instead.
Does a charger in a drive path need impact protection?
If a vehicle can strike it, yes, and this is a real inspection topic rather than an optional extra. Equipment exposed to physical damage needs protection appropriate to the exposure, which in a garage usually means relocating the unit outside the swept path, or fitting bollards or a guard where relocation is not possible. The cheapest version of this fix is choosing a different wall.
Getting your own panel and load numbers ready for an electrician? The EV Home Charging Install Planner is the paid version of these pages: 8 printable worksheets you fill in with your own numbers, plus the full PDF, $29.
How this page was researched
Specifications come from manufacturer documentation, listed safety certifications and verified owner reviews. We do not perform hands-on product testing and never claim to. Figures are researched planning information, not professional electrical advice. Last reviewed 2026-08-17.