Best Electrical Tools for an EV Install
Short answer
If you are managing an EV charger installation, the tool worth owning is a non-contact voltage tester such as the Klein NCVT3P at around $24.98, plus an outlet tester and a panel label kit. These verify an electrician's work and document the panel. None of them authorise you to install a 240 volt circuit, which a licensed electrician must size and install under permit.
The most useful tool for a homeowner having an EV charger installed is the Klein NCVT3P dual range non-contact voltage tester at around $24.98, because it answers the only question you genuinely need an instrument for: is this thing live. Add the Klein 80025 outlet and GFCI tester kit at around $26.99 and a waterproof panel label kit at around $9.99 and you have the complete homeowner set for under 65 dollars.
Read the framing of this page carefully, because it is unlike every other buying guide in this category. This list is for someone MANAGING and VERIFYING an installation, not performing one. The tools here exist to check an electrician's work, label a panel that will be lived with for decades, confirm a receptacle is wired the way it should be, and observe what the circuit actually draws during a charging session. None of them, individually or together, authorise you to install a 240 volt circuit. That work requires a licensed electrician, a permit and an inspection, and no purchase changes that.
Top pick, homeowner verification tool
Own this one first
KLEIN TOOLS
Klein NCVT3P Dual Range Voltage Tester
$24.98
A dual range non-contact voltage tester covering 12 to 1000 volts AC, with an audible alarm, a flashing LED and a torch built into the end. It is the cheapest way to answer the only question a homeowner genuinely needs an instrument for: is this thing live. It confirms, it does not authorise, and nothing about owning one makes 240 volt wiring your job.
- Range
- 12 to 1000 V AC
- Type
- Non-contact
- Alarm
- Audible and LED
- Light
- Built in
- Use
- Verification
- Price band
- Under $30
Paid link. Price shown when researched.
What is this list actually for?
An EV charger installation is a small project with a large number of decisions in it, and the homeowner makes almost none of them. The electrician sizes the conductor, chooses the overcurrent device, decides the route, terminates everything and answers to the inspector. What is left for you is the part nobody hands over: choosing well, understanding what was quoted, noticing when something is off, and living with the result for twenty years.
That is a real job and it has tools. Not wiring tools. Verification tools, documentation tools and observation tools. A non-contact voltage tester tells you whether a thing is live before you put a hand on it. An outlet tester tells you whether the receptacles around the work are still correctly wired afterwards. A label kit turns an unreadable directory into something the next person can use in the dark. A clamp meter tells an electrician what the circuit is actually doing, which is different from what the car reports.
There is also a legitimate reason to own instruments you will not use, which is recognising competence. An electrician who tests before touching, who checks the receptacle after energising and who leaves the directory legible is showing you something about how the rest of the job was done. Knowing what those tools are and what they say is part of judging a trade you cannot otherwise assess. The pricing side of the same judgement is in what electricians charge.
Where exactly does the homeowner line fall?
Plainly, and then repeatedly, because this is the part of the page that matters most.
You may plug things in and unplug them. You may read an app, a display or an instrument that does not require a cover to come off. You may test a 120 volt receptacle with a plug-in tester and press its GFCI test button. You may write on the panel door, take photographs, measure distances, and put your hand on a plug or a cover to feel for warmth. You may ask any question you like of the person doing the work.
You may not remove a panel cover. You may not land a conductor on a breaker, a lug or a receptacle terminal. You may not size a circuit, choose a breaker, run cable, bend conduit, cut into a supply whip or extend one. You may not energise anything that has not been inspected. This is not a matter of skill or of confidence, it is a matter of licensing, of insurance and of a circuit that runs near its rating for eight hours every night. A loose termination in a 60 amp continuous circuit is not a mistake you find out about immediately; it is one you find out about the following winter.
The full sequence of what happens, who does it and when, is in the home EV charger installation guide, and the inspection half of it is in EV charger permit and inspection. Read both before you buy a single tool, because they will tell you how little of this project is yours.
What should you check at each stage of the project?
Here is the whole homeowner job in one table, stage by stage, with the tool each stage actually needs and an explicit column for what stays untouched.
| Stage | Your job | Tool | What you do not touch |
|---|---|---|---|
| Before any quotes | Photograph the panel with the door closed and the directory legible | A phone, and the label kit if the directory is unreadable | The panel cover stays on |
| During the quote visit | Ask which method the load calculation used and what the run length is | None | Do not offer to help pull conductor |
| Rough-in, before the walls close | Photograph the conductor route, the conduit and the box locations | A phone and a tape measure | Nothing gets connected by you at any point |
| After energising, receptacle install | Confirm nearby 120 volt outlets still test correct and GFCIs still trip | Outlet tester with GFCI test | The 14-50 receptacle itself, which needs a different instrument |
| First charging session | Note the current the charger reports and feel the plug and cover after an hour | Your hand, and the charger app | Do not clamp anything inside the panel |
| Ongoing, once a season | Check for warmth, discolouration and water at every connection you can see | Non-contact voltage tester and a torch | Anything requiring a cover to come off |
Notice how much of the third column is a phone rather than an instrument. Photographs at rough-in are the single highest-value thing a homeowner does on this project, because once the wall closes, nobody knows where the conductor runs, and the next trade to put a screw through that wall will find out the hard way. Photograph the route with a tape measure in shot for scale.
Notice also what appears in the last two rows. Feeling a plug face and a cover after an hour of charging is the most useful diagnostic available to a homeowner and it needs no purchase at all. Warm is a warning and hot is a stop. Most of the failure modes covered in EV charger troubleshooting announce themselves as heat at a connection long before they announce themselves as a fault code.
Starter: the three things worth owning before the electrician arrives
This is the tier almost every reader should stop at. Sixty-five dollars, three items, and every one of them is used from outside a closed enclosure. Nothing here requires knowledge you do not have, and nothing here tempts you across the line.
Starter tier: $9.99 to $26.99
A voltage tester, an outlet and GFCI tester, and a label kit. The complete homeowner set for verifying and documenting an EV charger install.
KLEIN TOOLS
Klein NCVT3P Dual Range Voltage Tester
$24.98
Dual range, 12 to 1000 volts AC, audible and flashing alarms and a torch. Point it at a conductor, a receptacle or a charger enclosure and it tells you whether voltage is present without touching anything. Nothing else on this page is more useful per dollar.
- Range
- 12 to 1000 V AC
- Contact
- None required
- Alarms
- Sound and light
- Clip
Trade-off It detects presence, not absence with certainty. A quiet tester is not proof a conductor is dead.
Check price
KLEIN TOOLS
Klein 80025 Outlet and GFCI Tester Kit
$26.99
An outlet tester with a GFCI test function and a non-contact voltage pen in the same kit. Plug it into a 120 volt receptacle and it shows the wiring pattern: correct, reversed, open ground, open neutral. This is how you check the work around a new circuit without opening anything.
- Tests
- 120 V receptacles
- GFCI
- Trip test
- Pieces
- 2
- Includes
- Voltage pen
Trade-off It only fits standard 120 volt outlets, so it cannot check a 14-50 or a hardwired charger.
Check price
Ryukicy
Waterproof Breaker Panel Label Kit
$9.99
A waterproof vinyl breaker label kit with a directory sheet, covering up to 48 circuits. A new EV circuit is the moment to relabel the whole panel, and a legible directory is worth more in an emergency than any instrument here.
- Circuits
- Up to 48
- Material
- Vinyl
- Waterproof
- Yes
- Directory
- Included
Trade-off Labelling the panel door is fine. Anything behind the cover is not yours to touch.
Check pricePaid links. Prices shown when researched and change without notice.
The NCVT3P is dual range, which is the specification that matters: it covers 12 to 1000 volts AC, so it responds to a low-voltage control conductor as well as to a 240 volt supply, and it has both an audible alarm and a flashing LED so it works in a dark garage with hearing protection on. One caution that applies to every non-contact tester ever made: it proves presence reliably and absence unreliably. A tester that stays quiet is not proof a conductor is dead, because shielding, position and battery state all affect it. Treat silence as encouraging rather than as certainty, and never as a licence to touch.
The 80025 outlet tester kit checks the ordinary 120 volt receptacles around the work, which matters more than it sounds. Adding a circuit means somebody was inside the panel, and the classic post-job defect is not the new circuit at all: it is a neutral that got moved, showing up as an open ground or a reversed polarity on an existing outlet three rooms away. It takes ninety seconds to walk the garage and the laundry room with this and it is a genuinely useful thing to do the same day.
The panel label kit is the cheapest item here and the one you will be most glad of. A new EV circuit is the natural moment to relabel the whole directory, and a waterproof vinyl label survives a garage in a way a pencilled paper card does not. Label the outside of the door. Everything behind the cover belongs to the electrician.
Buy once: measuring what the circuit actually does
The middle tier is where the tools start to be about current rather than presence, and where the honest caveats multiply. A clamp meter is the correct instrument for measuring a charging session, and using it the way it wants to be used means clamping a conductor inside an open panel. That is not your task, so the reason to own one is narrower than it looks.
Buy-once tier: $17.64 to $64.98
A clamp meter, wire markers and a cutter and stripper. Useful, frequently for reasons unrelated to the charger, and none of them a permission slip.
KLEIN TOOLS
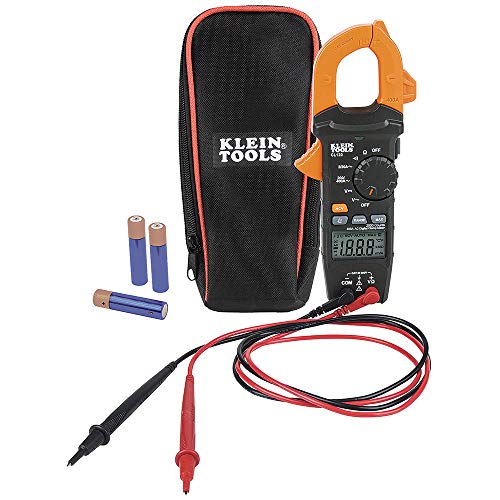
Klein CL120 Digital Clamp Meter
$64.98
An auto-ranging digital clamp meter reading up to 400 amps AC, plus voltage, resistance, continuity and non-contact detection. Clamp it around the charger supply and you can see the actual current draw during a session, which settles arguments about whether the car is derating or the circuit is.
- AC current
- Up to 400 A
- Ranging
- Auto
- Also reads
- Volts, ohms, continuity
- NCV
- Built in
Trade-off Clamping a live conductor means the panel is open, so this reading belongs to your electrician.
Check price
KLEIN TOOLS
Klein 56255 Panel Wire Markers with Directory
$12.48
Wire markers with a household panel directory. Where the label kit handles the breaker faces, these identify conductors, which is what you want in a subpanel or a junction that now has an EV feeder passing through it.
- Type
- Wire markers
- Directory
- Included
- Use
- Panel identification
- Price band
- Under $15
Trade-off Applying markers inside a panel is work for whoever is already inside the panel.
Check price
KLEIN TOOLS
Klein 11055EP Wire Cutter and Stripper
$17.64
A wire cutter and stripper for copper, and the one tool on this page you will use on ordinary jobs unrelated to the charger. Sized for building wire rather than for feeder conductor, which is another way of saying it is not the tool for the circuit this site is about.
- Cuts
- Solid and stranded copper
- Strips
- Building wire
- Made in
- USA
- Price band
- Under $20
Trade-off Owning strippers does not make terminating a 240 volt circuit a homeowner task. It is not.
Check pricePaid links. Prices shown when researched and change without notice.
The CL120 clamp meter is auto-ranging up to 400 amps AC and also reads voltage, resistance and continuity with a non-contact detector built in. During a charging session it answers a question nothing else can: is the car pulling what it claims, or is the charger quietly derating. If your car is charging slower than expected, that measurement separates a car-side limit from a circuit-side one in about a minute. It is also the tool that says most about your electrician, because clamping the supply during commissioning is what a careful one does before leaving.
The wire markers with a panel directory belong in the same category as the label kit and cost under fifteen dollars. If a subpanel is going in as part of the job, ask the electrician to mark the conductors while everything is open. It costs nothing at that moment and it is impossible later.
The 11055EP cutter and stripper is on this list with a caveat attached. It is an excellent tool for ordinary household wire and you will use it for lamp repairs and low-voltage work for the next twenty years. It is sized for building wire rather than for the feeder conductor an EV circuit uses, and more importantly, owning strippers does not make terminating a charging circuit a homeowner task. It is not. That sentence is worth reading twice because this is the exact tool that talks people across the line.
Ceiling: tradesperson instruments, and why you should not own them
Everything in this tier is a professional instrument. It is here so the page is complete and so you recognise the kit when it comes out of a van, not because there is a version of this project where a homeowner needs it.
Ceiling tier: $104.97 to $239.32
A professional multimeter, a conduit bender and an insulation resistance tester. Listed for recognition, not for purchase.

Fluke
Fluke 117 Digital Multimeter
$239.32
A digital multimeter with non-contact AC voltage detection that measures resistance, continuity, frequency and capacitance with automatic AC and DC selection. It is a professional instrument at a professional price and it is on this page mainly so you recognise one when your electrician uses it.
- Type
- Digital multimeter
- Measures
- Ohms, continuity, frequency
- NCV
- Built in
- Selection
- Automatic AC and DC
Trade-off Roughly ten times the price of the tester most homeowners need, for capability you will not use.
Check price
KLEIN TOOLS
Klein 51605 Iron Conduit Bender, 1 inch EMT
$104.97
An iron conduit bender for 1 inch EMT and 3/4 inch rigid, with a wide foot pedal, benchmark symbols and an angle setter. This is unambiguously a tradesperson tool. It exists on this list so the page is honest about where the boundary sits, and the boundary is here.
- Bends
- 1 in EMT
- Also
- 3/4 in rigid
- Pedal
- Wide foot
- Marks
- Benchmark and angle
Trade-off If you are bending conduit for an EV circuit you are doing work that requires a licence.
Check priceGeneric
Insulation resistance tester, 1000 V megohmmeter
The instrument used to prove a long feeder was not damaged during a pull, by applying a test voltage between conductors and measuring leakage. Genuinely useful on a trenched run to a detached garage, and genuinely not a homeowner instrument.
Trade-off It applies hundreds of volts on purpose. Misusing one damages equipment and injures people.
Check pricePaid links. Prices shown when researched and change without notice.
Who should not buy the ceiling tier
Almost everyone reading this. The Fluke 117 is roughly ten times the price of the tester most homeowners need and measures quantities you will never have a reason to know. It is a superb instrument and buying one to supervise a four-hour installation is like buying a torque wrench to check that a garage fitted your wheels.
The Klein 51605 conduit bender is the clearest line on this page, and it deserves to be said without hedging: this is a tradesperson's tool, and if you are bending 1 inch EMT for an EV charging circuit, you are performing licensed electrical work. There is no homeowner reading of that activity. Conduit for a charging circuit is sized, routed, filled and supported to rules that a bender does not teach you, all of which are covered from the planning side in conduit for an EV charger circuit. Buy this tool if you are in the trade. Otherwise it is a hundred dollars of encouragement in the wrong direction.
The insulation resistance tester is the same argument one step further. It deliberately applies hundreds of volts between conductors to look for leakage, which is exactly the right test after a long feeder has been pulled through a trench to a detached garage and exactly the wrong instrument in untrained hands. Ask whether your electrician performed one on a long buried run. Do not buy one to perform it yourself.
How we chose these tools
We did not test any of these tools in person and we do not claim to. Nothing here was used on a job by us, no readings were taken and no instrument was compared against a reference.
The picks come from published specifications, listed safety certifications and verified owner reviews read in volume. The filters were unusual for this site because the products are not part of the electrical installation. The first filter was scope: does this tool serve a homeowner who is managing a project, or does it only serve somebody performing licensed work. The starter tier is entirely the former, the ceiling tier is entirely the latter, and the page says so rather than blurring it to sell more items.
The second filter was whether the instrument's stated range covers what a home charging circuit involves, which for a voltage tester means covering 240 volts comfortably and for a clamp meter means covering the current a 60 amp circuit can carry with headroom to spare. The third was durability in owner reports, since a tester that lives in a garage drawer gets dropped, and a battery compartment or a probe lead is where these fail.
The fourth filter was the one that governs the whole page: no tool was included because it would let a reader do more of the work themselves. Several obvious candidates were left out for exactly that reason, and the conduit bender was included only because omitting it would have been dishonest about where the boundary is.
Prices were accurate when researched and change without notice. Where a product has no verified Amazon listing it appears as a search link rather than a direct one, which is deliberate: a fabricated product link is worse than no link.
Buying tips: how to actually use this set
Test the tester before you trust the tester
Every non-contact voltage tester should be proved on a circuit you know is live before you use it on one you hope is dead, and again afterwards. A flat battery and a dead conductor look identical through the device. Doing this takes four seconds and it is the difference between an instrument and a talisman.
Walk the whole house with the outlet tester, not just the garage
Panel work moves neutrals and grounds, and the defect it creates shows up wherever those conductors landed, which is frequently nowhere near the new circuit. Test every accessible 120 volt receptacle on the day of the install and press the test button on every GFCI. If something reads wrong, the electrician is still contactable and it is still their work.
Relabel the whole panel, not only the new breaker
Directories in older houses are a mixture of pencil, faded printing and hopeful guesses, and adding one accurate line to a page of inaccurate ones helps nobody. Switch circuits one at a time with somebody calling out what went dark, write the whole thing on a waterproof label, and photograph the finished directory so it exists somewhere other than a garage wall.
Use the charger app before you use an instrument
Most smart chargers report delivered current and energy per session, which answers the majority of questions people buy a clamp meter for. Start there, then use an energy monitor if you want the same figure alongside the rest of the house, and only involve an instrument inside the panel when there is a genuine discrepancy for an electrician to investigate.
Buy tools with the install, not after a problem appears
The verification tier is worth having on the day the electrician is standing in your garage, because that is the only moment when a wrong reading is cheap to fix. Finding an open ground six months later means a call-out, a conversation about who caused it and a bill. Price the install itself through the installation cost calculator and treat sixty-five dollars of testers as part of it.
Keep them where the panel is
A tester in a kitchen drawer is a tester you do not use. Put the voltage tester, the outlet tester and a torch in a small box beside the panel, along with the charger manual, the permit paperwork and the inspection sign-off. The next owner of the house will thank you, and so will you the first time something trips at eleven at night.
Where to go next
If you are at the stage of choosing an electrician, read what electricians charge so you can read a quote properly, then EV charger permit and inspection so you know what the inspector will be looking at. If the installation is already in and something is behaving oddly, start with EV charger troubleshooting rather than with an instrument. And if you have not started at all, the whole sequence is laid out in the home EV charger installation guide.
Common questions
Do I need any tools to get an EV charger installed?
Strictly, none. A licensed electrician arrives with everything required, and the entire installation is their work rather than yours. The tools worth owning are for managing the project and verifying the result: a non-contact voltage tester to confirm what is live, an outlet tester to check the 120 volt circuits around the work, and a label kit so the panel directory is legible afterwards. None of them authorise you to wire anything.
Can I install a 240 volt EV charging circuit myself if I own the right tools?
No. Owning a clamp meter and a set of strippers changes nothing about who is permitted to install a 240 volt continuous-load circuit. Conductor sizing, overcurrent protection, grounding, terminations and ground-fault protection are code matters with local amendments, a permit and an inspection are normally required, and a licensed electrician must size and install the circuit. The tools on this page are for checking work, not doing it.
What is the single most useful tool for a homeowner here?
A non-contact voltage tester, at under 30 dollars. It answers the one question a homeowner genuinely needs an instrument for, which is whether something in front of them is live, and it does so without contact. Use it before you touch a charger enclosure that has been rained on, before you handle a cover plate, and any time a breaker has been switched by somebody who is not standing next to you.
How do I measure what my charger is actually drawing?
Three ways, in descending order of sense. Read it in the charger app, which most smart chargers report per session. Read it from a whole-home energy monitor with a sensor on the charger circuit, which also gives you the timing. Or have an electrician clamp a meter around the supply conductor during a session. The third gives the most direct reading and is the only one that involves an open panel, which is why it is their job.
Should I buy a conduit bender?
No. A conduit bender is a tradesperson tool for a tradesperson task, and if you are bending EMT for an EV charging circuit you are performing licensed electrical work. It is listed on this page for honesty about where the line falls rather than as a recommendation. The only homeowners who should own one already know why, and they are not reading a buying guide to find out.
What should I check after the installation is signed off?
Four things, none of which require opening anything. That the panel directory names the new circuit clearly. That the 120 volt receptacles near the work still test correct and their GFCIs still trip. That the charger reports the current you expect during a real session. And that after an hour of charging, the plug face, the cover and the enclosure are cool to the touch rather than warm.
Getting your own panel and load numbers ready for an electrician? The EV Home Charging Install Planner is the paid version of these pages: 8 printable worksheets you fill in with your own numbers, plus the full PDF, $29.
How this page was researched
Specifications come from manufacturer documentation, listed safety certifications and verified owner reviews. We do not perform hands-on product testing and never claim to. Figures are researched planning information, not professional electrical advice. Last reviewed 2026-08-17.